The contents of this guide have been moved to our documentation website here.
This thread will remain open for discussion.
The contents of this guide have been moved to our documentation website here.
This thread will remain open for discussion.
Hello!
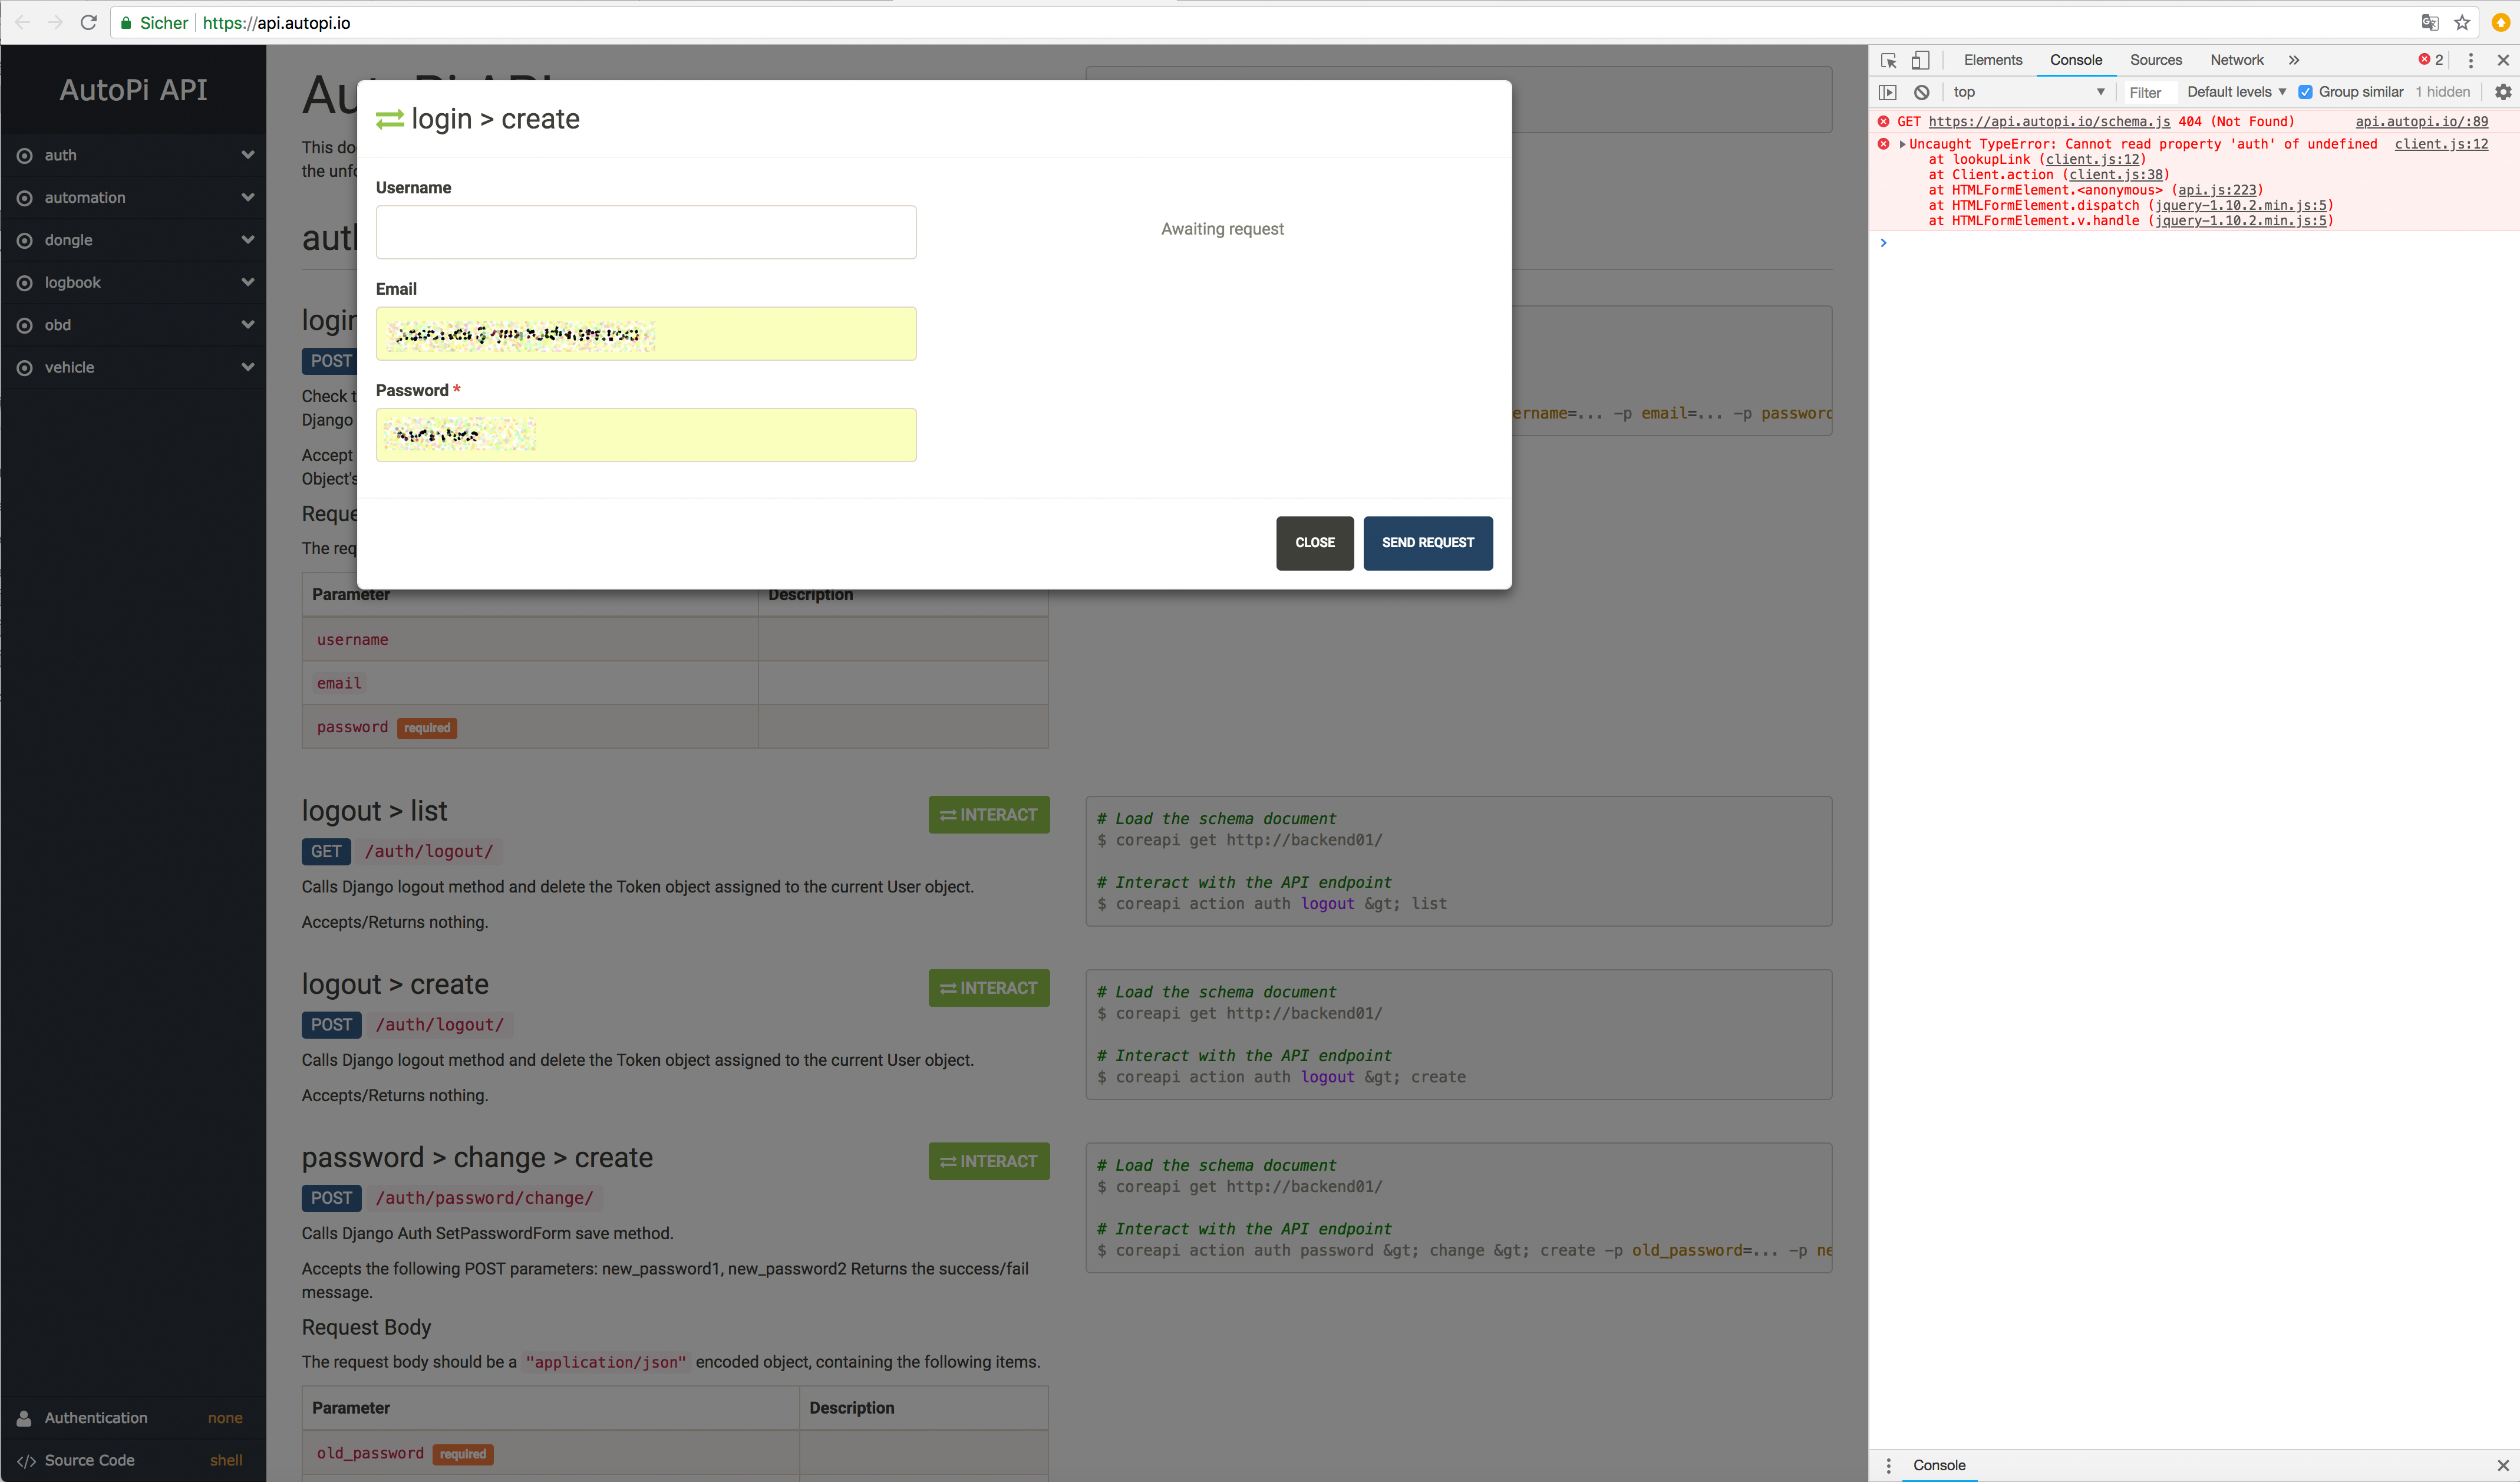
I was trying to do as mentioned in the tutorial, but if i send email und password by clicking Interact and Send request i always run into an error “Uncaught TypeError: Cannot read property ‘auth’ of undefined” (see attachment).
What am I doing wrong?
Hi Peter
Ah, yeah I can see that issue as well, we will look into it.
So I think you are doing everything right, but the issue is in our end.
Thank you for reporting the error 
Best regards
/Malte
I have same problem, when it will be fixed?
Terminal in local i run pip.install coreapi-cli, because pip install coreapi-cli don´t working like guide…
Installation say everything is installed already, nothing done.
Commands are not working on cloud terminal either, always timeout.
But i can´t use coreapi command on terminal to get API functions working.
How i should run commands on terminal and are you planning to give command list guide somewhere or should i just try finding code and commands what to use?
Hi Hakkyou
The above commands is not used in the local or in the cloud terminal, but for your own terminal on your computer.
We are working on updating our API documentation away from using coreapi.
So for now you should disregard the sample on the right side, ie. no coreapi, and instead use something like postman to send requests to the API.
As noted above, it’s also possible to see the requests that the frontend on my.autopi.io is sending to the API.
The documentation portal at api.autopi.io should give an overview of all available endpoints, but some of the detailed parameters is not yet included in the API portal.
By the way, the issue in the portal should be fixed later today.
Best regards
/Malte
Hi,
I’m not sure I understand how to do it.
I try with Postman and I always have a login page nothings else.
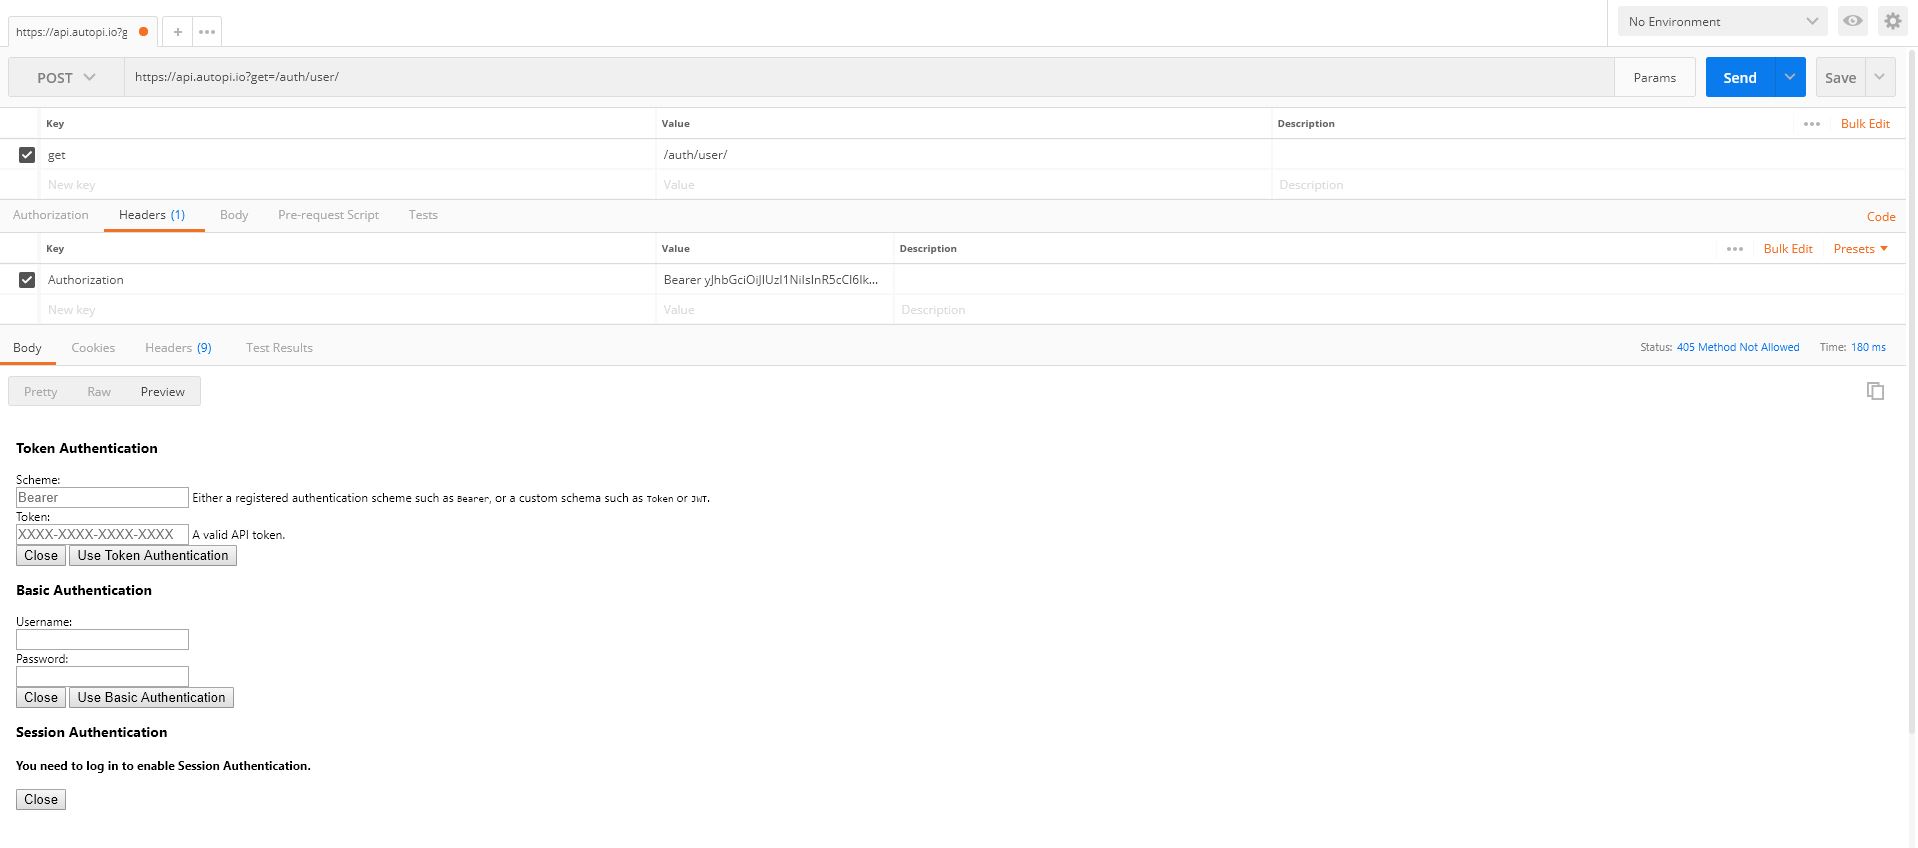
Hi Reginald
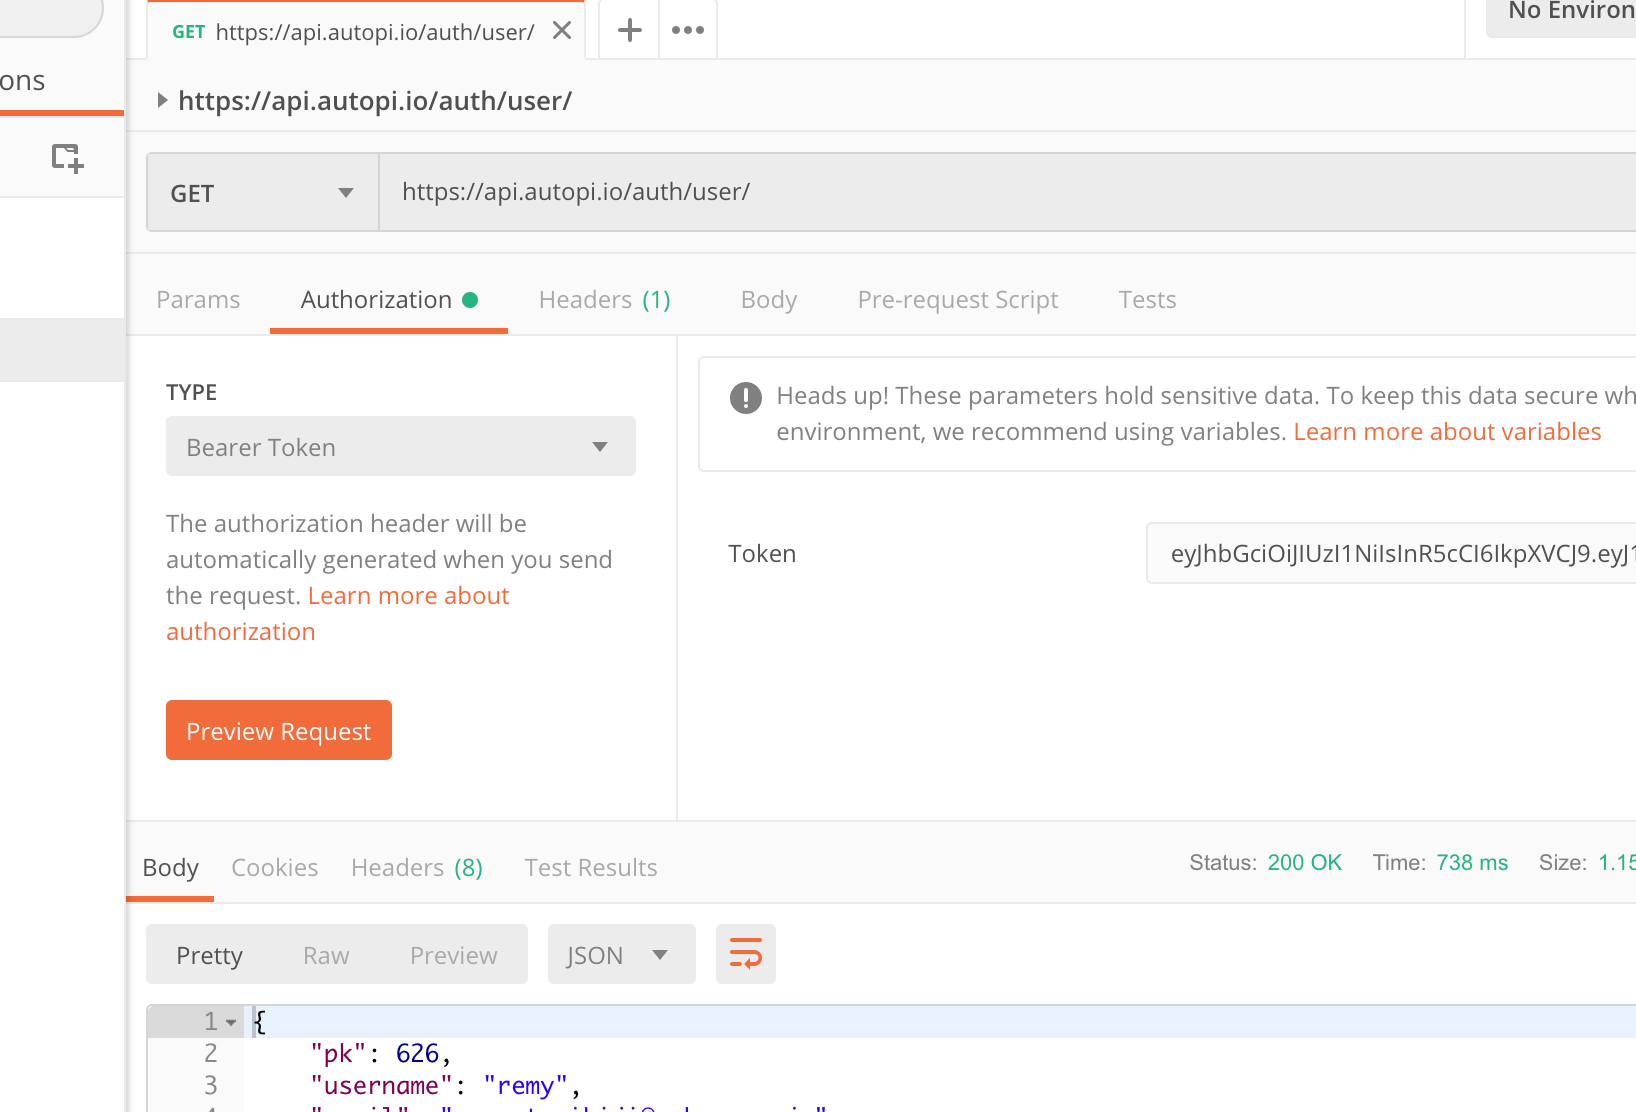
The url and the method you are trying to call is incorrect, it should instead be a GET request to
https://api.autopi.io/auth/user/
The above endpoint is the one that returns the logged in user object.
(To retrieve a token, you need to send a POST request to https://api.autopi.io/auth/login/ as specified in the guide above)
But the authorization header is set correctly.
Remember that the token currently expires after 8 hours, but it will tell you in the response if the token is valid or not.
Best regards
/Malte
Ok I start to understand how it’s work.
But I want to make a Dashboard like your but with real time information and only information I Want, if the token expires after 8 hour it’s will never work.
How can I authenticate without time limitation?
Hi Reginald
We have on our roadmap some changes to the API access, which will allow users to generate an API key for their user, that will not expire. This will allow the your dashboard to be logged in indefinitely.
Currently you will need to log in once every 8 hours.
Usually you’d make your application send a login request, maybe on startup, and then use the token for any subsequent requests, while either listening for 401 Unauthorized status codes from the responses to the API, or by logging in again every N hours automatically.
We hope to have the above API key changes ready in the next few weeks.
But as i’ve written above, there are workarounds until you can generate a API token that doesn’t expire.
Best regards
/Malte
Is there a way to get the LAST POSITION from a device through the REST API? I can get positions as mentioned in step 3 above. But if i don’t know when the device moved the last time, i can’t set a start_utc?
Maybe the REST API supports a call of “LAST POSITION”. If not, can i get the datetime of last movement to get last position?
Hi Peter
Yes, you can retrieve the last known position using this endpoint
https://api.autopi.io/logbook/most_recent_position/
  ?date_cutoff=2018-01-29T09:54:58.679Z
  &device_id=DEVICE_ID
date_cutoff: Is the max timestamp (UTC) of the logged positions. So if you want the position of the car on christmas eve, you invoke the endpoint with the date_cutoff set to the UTC timestamp of christmas eve.
device_id: Id of the device, not the printed Unit_id you received with the device, but the ID in the api.
Call the “/dongle/devices” endpoint to get the list of devices, which shows the api.
Best regards
/Malte
Hello Malte
works great. Thank you very much!
Hello,
Tried using Python and the coreapi to interface with the AutoPi, however unsuccessfully. Managed to install coreapi but the following code snipet
import coreapi
client = coreapi.Client()
schema = client.get("https://api.autopi.io/auth/login/")
gave the error
Traceback (most recent call last):
File “AutoPi.py”, line 28, in
schema = client.get(“https://api.autopi.io/auth/login/”)
File “C:\Users\ososc\AppData\Local\Programs\Python\Python37-32\lib\site-packages\coreapi\client.py”, line 136, in get
return transport.transition(link, decoders, force_codec=force_codec)
File “C:\Users\ososc\AppData\Local\Programs\Python\Python37-32\lib\site-packages\coreapi\transports\http.py”, line 386, in transition
raise exceptions.ErrorMessage(result)
coreapi.exceptions.ErrorMessage: <Error: 405 Method Not Allowed>
detail: “Method “GET” not allowed.”
What could be wrong? I managed to use requests.post() to retrieve some data. But it would be nice to get coreapi working, since it seems to be more user-friendly.
Best regards,
I appreciate this guide. It helped me get started on pulling data, but I am not able to find an exhaustive list of what “keys” (for example: https://api.autopi.io/logbook/storage/data/?type=primitive&key=coolant_temp&device_id=DEVICE_ID&start_utc=2018-05-02T15:17:51.389Z&end_utc=2018-05-02T15:35:07.360Z&interval=5m ) are possible to read data from. Specifically I am interested in getting the data from the accelerometer on my AutoPi, can you guide me through that?
Hi
Yeah, we are working on making that much more transparent.
To get the accelerometer, you specify the type “accelerometer”, instead of “primitive”, and then don’t specify the key.
That should give you the saved accelerometer values, but to get the device to save the accelerometer values, you also need to create a job that loags the accelerometer values.
To do that, you should go into jobs, and create a job that calls the “acc.xyz” function, with the returner set to “cloud”.
EDIT: You no longer need to manually log the accelerometer, it is part of the default logging now. Check out the advanced settings to see the settings for the accelerometer.
Best regards
/Malte
How can i get raw data of each trip via API ? Could you guys help to advise?
Hi Sureerat
You can retrieve the trips via the API, and each trip includes a start time and an end time, which can be used to retrieve the raw data of the trips.
Check out the guide above, on how to retrieve the raw data.
Best regards
/Malte
@Malte
ok, i had download the postman, and succefull connected
so, now I want the request for new logger I had make, like SoC (for Ev car)
how to write it exactly same as that but for the SoC ?
I only need the result to send to mysql table, so 0 to 100 result. it is the raw data ?
@Remy_Tsuihiji this is what works for me:
https://api.autopi.io/logbook/storage/read/?from_utc=2019-03-15T22:53:56.493Z&field=obd.soc_display.value&field_type=json&device_id={your_device_id}&interval=1s&end_utc=2019-03-16T09:53:56.495Z
Times are just for example, you want to change them 
Also, I have no idea what field_type does. If it’s empty, I don’t get anything. If I put anything (“1” or “json” or “bla”) it spits out json formatted reply.
Strange
Make sure to also include bearer token in headers! You also get the device_id when requesting for a token.